
Vanilla ice cream traces its roots to the early 17th century when European explorers first encountered vanilla orchids in Mexico. The delicate pods quickly became prized for their fragrant flavor, eventually making their way into frozen desserts in the United States by the late 1800s. Over time, technology advanced, allowing home cooks to recreate the luxurious texture once reserved for artisanal parlors. Today, the Ninja Creami embodies that evolution, letting anyone achieve a professional‑grade scoop with simple, reliable steps.
Why You'll Love It
-
- Ultra‑smooth texture without any grit
-
- Pure vanilla flavor bursts with every bite
-
- Minimal ingredients, maximum comfort
-
- Easy cleanup and quick turnaround
"The creamiest vanilla ice cream I’ve ever made—just like a boutique shop, but from my kitchen!"
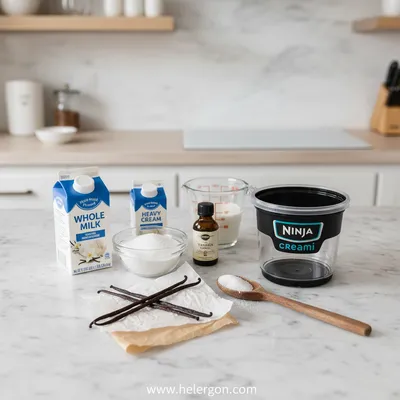
Essential Ingredient Guide
- Heavy cream: Choose a high‑fat cream for richness; it creates that luxurious mouthfeel.
- Whole milk: Balances the cream's heaviness and helps the mixture freeze evenly.
- Vanilla bean or extract: Real beans add specks of flavor; extract works if beans are unavailable.
- Granulated sugar: Sweetens and aids in a smooth freeze; avoid brown sugar for a cleaner taste.
- A pinch of salt: Enhances the vanilla aroma and rounds out sweetness.
- Optional: a splash of bourbon: Add only a teaspoon; it prevents icy crystals and deepens flavor.
Complete Cooking Process
-
Ingredient Readiness:
Measure and combine cream, milk, sugar, and vanilla in a bowl; whisk until sugar dissolves.
-
Flavor Development:
Let the mixture rest for 10 minutes so the vanilla infuses fully before freezing.
-
Texture Control:
Pour into the Ninja Creami container, seal, and freeze flat for at least 24 hours.
-
Finishing Touches:
Run the Creami cycle, then fold in any optional mix‑ins gently.
-
Serving Timing:
Serve immediately for a soft‑serve feel, or refreeze 30 minutes for a firmer scoop.
-
Use freshly cracked vanilla beans for depth.
-
Chill the mixing bowl before whisking to keep the mixture cold.
-
If ice crystals appear, run an extra Creami cycle.
Pro Tips
These little adjustments can turn a good batch into a truly memorable one. I often find that the extra chill of the bowl makes the sugar dissolve faster, letting the vanilla shine without any grainy texture. So, take a moment, breathe in the scent of vanilla, and enjoy the process as much as the result.
 Easy Weeknight Dinners
Thai Shrimp Wraps – Flavor-Packed Easy Dinner
Crispy, aromatic shrimp wrapped in lettuce, perfect for a quick, flavorful dinner.
The essence of the dish:
It’s the simplicity of vanilla, the richness of cream, and the gentle hum of the Ninja Creami that creates a dessert that feels both classic and contemporary.
A fun fact or historical angle:
The word "vanilla" comes from the Spanish "vainilla," meaning little pod, a nod to the delicate orchids that give us this beloved flavor.
Flavor or sensory focus:
Expect a buttery smoothness on the tongue, with fragrant vanilla notes that linger sweetly, like a soft summer breeze.
You Must Know
-
Cold ingredients freeze evenly
-
Do not over‑fill the container
-
Allow the Creami to finish its cycle fully
Frequently Asked Questions
→ Can I use plant‑based milk?
Yes, almond, coconut, or oat milk work, but the texture will be slightly lighter.
→ How long can the ice cream be stored?
Keep it in an airtight container for up to two weeks; stir before serving.
→ Do I need to pre‑churn the mixture?
No, simply whisk, freeze, and let the Creami handle the churn.
→ Can I add mix‑ins like chocolate chips?
Add them after the first Creami cycle and pulse gently to distribute.
→ What if the ice cream is too soft after the cycle?
Run a second Creami cycle or refreeze for 30 minutes for a firmer bite.
→ Is it okay to use vanilla extract instead of beans?
Absolutely; use 2 teaspoons of pure extract for the same flavor strength.
Nutrition Facts
per serving
260
Calories
3g
Protein
22g
Carbs
18g
Fat
Taste Profile
Richly sweet with fragrant vanilla notes
Ingredient Substitutions
Don't have an ingredient? Try these alternatives
Provides a dairy‑free richness but adds a slight coconut aroma.
Use 2/3 cup honey; it adds floral notes and reduces crystallization.
Recipe Variations
Try these delicious twists on the original
Spicy Version
Add 1/4 tsp ground cinnamon and a pinch of cayenne for a warm, subtle heat.
Mediterranean Style
Stir in crumbled feta and a drizzle of honey after churning for a sweet‑savory twist.
Common Mistakes to Avoid
Learn from others' mistakes for perfect results
- Over‑filling the pint, leading to overflow during churn.
- Skipping the rest period, which reduces vanilla infusion.
- Using low‑fat dairy, resulting in icy texture.
Meal Prep & Storage
Make Ahead Tips
The mixture can be whisked and refrigerated up to 24 hours before freezing; this deepens the vanilla flavor.
Leftover Ideas
Stir gently to restore creaminess and enjoy within two weeks; microwave briefly to soften if needed.
Perfect Pairings
Serve this with...
Cooking Timeline
Gather and measure all ingredients; whisk sugar into dairy.
Add vanilla bean seeds and extract; let mixture rest.
Pour into Creami pint, seal, and place in freezer.
Run the Creami "Ice Cream" cycle; add optional mix‑ins if desired.
Serve immediately or refreeze briefly for firmer texture.
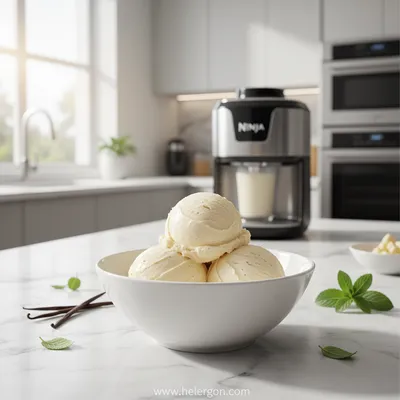
Best Ninja Creami Vanilla Ice Cream Recipe
A silky, home‑made vanilla ice cream crafted with the Ninja Creami, offering a velvety texture and subtle aromatic notes that make every scoop a quiet celebration.
Timing
Prep Time
15 Minutes
Cook Time
0 Minutes
Total Time
25 Minutes plus 24‑hour freeze
Recipe Details
Ingredients
Base Ice Cream
-
01
2 cups heavy cream
-
02
1 cup whole milk
-
03
3/4 cup granulated sugar
-
04
1 vanilla bean, split and seeds scraped
-
05
1 tsp pure vanilla extract
-
06
Pinch of kosher salt
Optional Mix‑ins
-
01
2 tbsp dark chocolate chips
-
02
1 tbsp caramel swirls
Instructions
In a medium bowl, whisk together heavy cream, whole milk, and sugar until the sugar fully dissolves.
Add the vanilla bean seeds, vanilla extract, and a pinch of salt; whisk gently, then let the mixture rest for 10 minutes.
Pour the mixture into the Ninja Creami pint container, seal the lid, and place it in the freezer for at least 24 hours.
After freezing, insert the container into the Creami, select the "Ice Cream" function, and let the machine spin until smooth.
If using optional mix‑ins, add them now and use the "Mix‑In" button for a brief pulse.
Serve immediately for a soft‑serve texture or refreeze 30 minutes for a firmer scoop.
Notes & Tips
-
1
For an ultra‑smooth finish, strain the mixture through a fine‑mesh sieve before freezing.
-
2
If you prefer a richer flavor, substitute half of the milk with additional cream.
-
3
A tiny splash of bourbon or rum can add depth and help prevent ice crystals.

Tools You'll Need
-
Ninja Creami machine
-
Medium mixing bowl
-
Whisk
-
Measuring cups and spoons
-
Sharp knife (for vanilla bean)
-
Fine‑mesh sieve
Must-Know Tips
-
Don’t over‑fill the pint; leave space for expansion.
-
Use freshly cracked vanilla beans for aromatic depth.
-
If the ice cream is grainy, run a second Creami cycle.
Professional Secrets
-
Chill the mixing bowl before whisking for faster sugar dissolution.
-
Freeze the container flat to ensure even freezing.
-
Add a pinch of salt to balance the sweet vanilla flavor.

Get Delicious Recipes Weekly
Join 25,000+ home cooks getting our best recipes straight to their inbox.
Free forever • No spam • Unsubscribe anytime