
Ice cream sandwiches date back to early 20th‑century America, where street vendors offered a convenient handheld dessert. Over decades, the concept evolved, inspiring pastry chefs to merge cake and ice cream in layered creations. The result is a crowd‑pleasing treat that balances nostalgic flavors with modern presentation.
Why You'll Love It
-
- No‑bake, perfect for hot days
-
- Customizable flavors for any palate
-
- Textural contrast of soft cake and smooth ice cream
-
- Elegant presentation with minimal effort
"The ice‑cream sandwich cake was the highlight of our potluck—creamy, beautiful, and so easy!"
Essential Ingredient Guide
- Vanilla cake layers: Choose a light, airy sponge; it cradles the ice cream without weighing it down.
- Premium vanilla ice cream: A high‑fat ice cream stays firm longer; let it soften just enough to spread.
- Chocolate ganache: Adds richness and a glossy finish; use dark chocolate for depth.
- Sea salt flakes: A pinch on the ganache heightens chocolate flavor.
- Fresh berries: A splash of acidity balances sweetness and adds color.
- Whipped cream: Optional swirl for extra lightness; fold in a touch of vanilla.
Complete Cooking Process
-
Ingredient Readiness:
Trim cake layers, soften ice cream in the fridge, and melt chocolate for ganache.
-
Flavor Development:
Combine softened ice cream with vanilla extract, then spread between cake layers.
-
Texture Control:
Allow each assembled layer to chill, ensuring firm structure before adding ganache.
-
Finishing Touches:
Drizzle ganache, sprinkle sea salt, and garnish with berries just before serving.
-
Serving Timing:
Serve within two hours of final assembly for optimal texture and flavor.
-
Use a springform pan for easy removal
-
Freeze the cake overnight for cleaner slicing
-
Add a thin layer of melted chocolate between cake and ice cream to prevent sogginess
-
Taste the ganache before glazing; adjust sweetness if needed
Pro Tips
Well, these little adjustments can make a big difference. I’ve found that a night’s rest lets the flavors meld beautifully, and the cake holds its shape better when sliced. So, set aside some quiet time while the cake chills—it’s worth the patience.

The essence of the dish:
A soft sponge paired with creamy ice cream, all cloaked in silky chocolate—each bite offers a nostalgic crunch followed by velvety smoothness.
A fun fact or historical angle:
The original ice‑cream sandwich was a street‑food staple during the 1930s, often sold for a nickel.
Flavor or sensory focus:
Expect the cool kiss of vanilla ice cream, the gentle bite of cake, and the bittersweet snap of dark chocolate.
You Must Know
-
Work quickly once ice cream softens
-
Keep the cake cold until serving
-
Use high‑quality chocolate for shine
Frequently Asked Questions
→ Can I use a different ice cream flavor?
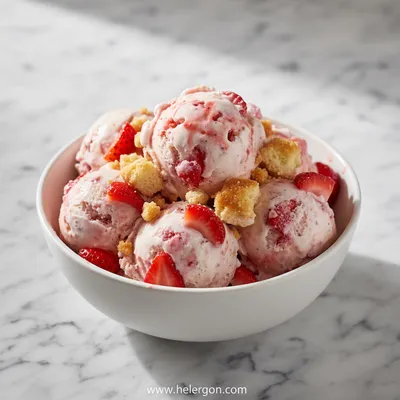
Absolutely—try strawberry, mint chocolate chip, or even almond milk ice cream for a twist.
→ How long can the cake stay refrigerated?
It stays fresh for up to three days, though the ganache may firm up further.
→ Do I need a special pan?
A 9‑inch springform pan works best; it releases the cake cleanly.
→ Can I make this vegan?
Swap the cake for a vegan sponge and use dairy‑free ice cream and chocolate.
→ What if my kitchen is warm?
Keep the cake in the freezer for a few minutes before serving to maintain firmness.
→ How do I avoid soggy cake layers?
Brush a thin layer of melted chocolate on the cake before spreading the ice cream.
Nutrition Facts
per serving
420
Calories
5g
Protein
45g
Carbs
22g
Fat
Taste Profile
Creamy sweet with a hint of bitterness from chocolate
Ingredient Substitutions
Don't have an ingredient? Try these alternatives
Works well for dairy‑free; may need a touch more sugar.
Gives a sweeter ganache, adjust salt accordingly.
Recipe Variations
Try these delicious twists on the original
Spicy Version
Add a pinch of cayenne and swirl in mint chocolate chip ice cream for a subtle kick.
Mediterranean Style
Incorporate pistachio crumble between layers and drizzle with honey.
Common Mistakes to Avoid
Learn from others' mistakes for perfect results
- Letting ice cream melt too much before spreading
- Skipping the freeze step before adding ganache
- Using too much ganache, making the cake soggy
Meal Prep & Storage
Make Ahead Tips
You can assemble the cake layers and freeze them up to 24 hours ahead; just add ganache and garnish moments before serving.
Leftover Ideas
Slice leftovers and serve with a drizzle of melted chocolate; re‑freeze for up to two days.
Perfect Pairings
Serve this with...
Cooking Timeline
Prepare cake layers and let them cool.
Soften ice cream and blend with vanilla extract.
Assemble layers with ice cream, wrap, and freeze.
Melt chocolate and cream to form ganache.
Glaze cake with ganache and add berries.
 Sweet Bakes & Desserts
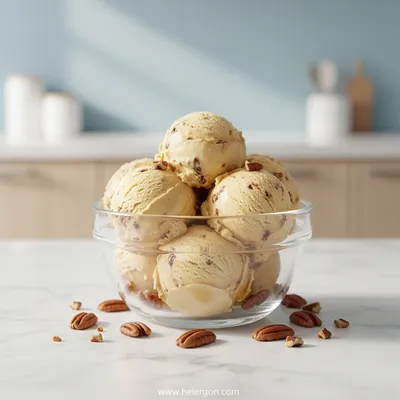
Butter Pecan Ice Cream Recipe
Creamy homemade butter pecan ice cream with crunchy pecans and a buttery finish.
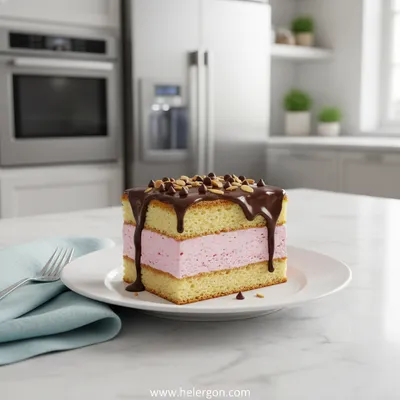
Ice Cream Sandwich Cake – Easy No‑Bake Dessert
A playful, creamy treat that layers soft vanilla cake, chill‑kissed ice cream, and glossy chocolate ganache—perfect for gatherings and summer evenings.
Timing
Prep Time
20 Minutes
Cook Time
0 Minutes
Total Time
20 Minutes
Recipe Details
Ingredients
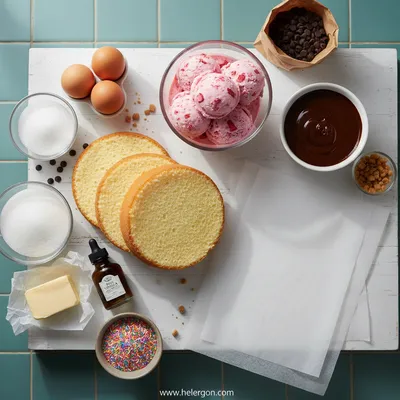
Cake Layers
-
01
2 boxes (about 12 oz each) vanilla sponge cake mix, prepared and baked
-
02
1/4 cup melted butter for brushing
Ice Cream Filling
-
01
1½ quarts vanilla ice cream, softened
-
02
2 tbsp vanilla extract
Chocolate Ganache
-
01
8 oz dark chocolate, chopped
-
02
½ cup heavy cream
-
03
1 tsp sea salt flakes
Garnish
-
01
Fresh berries (strawberries, blueberries)
-
02
Optional whipped cream
Instructions
Bake the cake layers according to the package, then let them cool completely. Slice each layer horizontally to create four thin sheets.
Brush each cake sheet lightly with melted butter to add moisture and a subtle richness.
In a bowl, stir softened vanilla ice cream with vanilla extract until smooth. Spread a generous layer over the first cake sheet, then place the second sheet on top.
Repeat the ice cream spreading and layering until all cake sheets are stacked. Wrap the assembled cake tightly in plastic wrap and freeze for 1 hour.
Meanwhile, heat the heavy cream in a saucepan until just simmering, then pour over the chopped dark chocolate. Stir until glossy ganache forms; stir in sea salt.
Remove the cake from the freezer, discard the wrap, and place on a serving platter. Pour the ganache over the top, letting it drip down the sides.
Garnish with fresh berries and a dollop of whipped cream if desired. Return to the freezer for 15 minutes before slicing.
Notes & Tips
-
1
If the ice cream becomes too soft while spreading, return the cake to the freezer for a few minutes.
-
2
Use a sharp knife warmed in hot water for clean slices.
-
3
Feel free to substitute the vanilla cake with chocolate or lemon for a different flavor profile.
Tools You'll Need
-
Springform pan
-
Sharp knife
-
Plastic wrap
-
Mixing bowl
-
Saucepan
-
Spatula
Must-Know Tips
-
Don’t over‑mix the ice cream filling, it can become grainy.
-
Let ganache cool slightly before pouring; otherwise it may melt the ice cream.
-
Trim cake edges for a neat appearance.
Professional Secrets
-
Use room‑temperature butter for an even brush.
-
Chill the assembled cake before adding ganache for a smooth finish.
-
Add a pinch of sea salt to the chocolate to intensify flavor.

Get Delicious Recipes Weekly
Join 25,000+ home cooks getting our best recipes straight to their inbox.
Free forever • No spam • Unsubscribe anytime