
The beloved combination of chocolate, marshmallow, and graham crackers traces its roots to the early 20th‑century American camping tradition, where fire‑roasted treats became a rite of passage. Over time, the portable version—now known as s'mores cookie bars—has found its way into kitchens across the country, offering the same comforting blend without the need for a campfire.
Why You'll Love It
-
- Easy, no‑bake assembly
-
- Soft, chewy texture with a crunchy top
-
- Perfect balance of sweet and salty
-
- Great for kids and adults alike
"These bars taste just like sitting around the fire, but without the mess!"
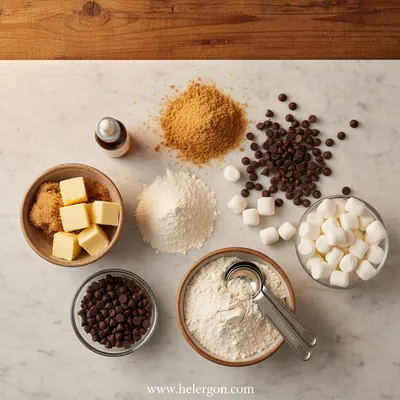
Essential Ingredient Guide
- Graham cracker crumbs: Forms the buttery base; toast lightly for extra aroma.
- Chocolate chips: Choose semi‑sweet for a mellow, melty finish.
- Mini marshmallows: They melt into a gooey layer; use fresh for best puff.
- Butter: Adds richness; melt gently to keep the crust tender.
- Brown sugar: Adds depth and a subtle caramel note.
- Vanilla extract: A few drops brighten the overall flavor.
Complete Cooking Process
-
Ingredient Readiness:
Measure and gently melt butter with brown sugar; crush graham crackers into fine crumbs.
-
Flavor Development:
Combine butter mixture with crumbs, press into pan, then melt chocolate over the base.
-
Texture Control:
Scatter marshmallows, letting them sit so they soften but retain a light fluff.
-
Finishing Touches:
Toast the top briefly under a broiler for a golden kiss.
-
Serving Timing:
Cool slightly before cutting so bars hold their shape, then serve warm.
-
Use parchment paper for an easy lift.
-
Press the crust firmly to avoid crumbling.
-
Add a pinch of sea salt for a subtle contrast.
-
Store in an airtight container for up to three days.
Pro Tips
Well, I’ve learned that a little patience when the bars set makes all the difference. Let them rest just a moment, and you’ll notice the edges hold together nicely, while the center stays soft and inviting. That's the sweet spot for any gathering.

The essence of the dish:
It’s the marriage of crunchy crumb, smooth chocolate, and fluffy marshmallow that makes these bars unforgettable. A whisper of vanilla ties everything together, while a light dusting of sea salt lifts the flavors.
A fun fact or historical angle:
Did you know the original s’mores were popularized in 1927 by the Girl Scouts? They called it a "marshmallow sandwich" before the name stuck.
Flavor or sensory focus:
You’ll first notice the sweet, buttery crust, then the melt‑in‑your‑mouth chocolate, and finally the warm, airy marshmallow that pulls it all together.
You Must Know
-
Do not over‑bake the top; a light golden hue is enough.
-
Use fresh marshmallows for maximum puff.
-
If you like a richer taste, substitute half the chocolate with dark cocoa.
Frequently Asked Questions
→ Can I make these bars gluten‑free?
Yes, simply swap graham crackers for a gluten‑free graham alternative or crushed gluten‑free cookies.
→ How do I keep the bars from sticking to the pan?
Line the pan with parchment paper and lightly grease it; the bars lift cleanly.
→ Can I add nuts for extra crunch?
Absolutely – toasted pecans or walnuts work nicely, just fold them into the crust.
→ Do I need to refrigerate after baking?
No, they are fine at room temperature for a day, but cooling helps them set.
→ What’s a good dairy‑free alternative?
Use coconut oil instead of butter and dairy‑free chocolate chips.
→ Can I freeze leftovers?
Yes, wrap tightly and freeze for up to two months; thaw before serving.
Nutrition Facts
per serving
210
Calories
3g
Protein
30g
Carbs
9g
Fat
Taste Profile
Richly sweet with a hint of buttery salt
Ingredient Substitutions
Don't have an ingredient? Try these alternatives
Provides a similar buttery flavor.
A caffeine‑free alternative with a naturally sweet taste.
Recipe Variations
Try these delicious twists on the original
Spicy Version
Add a pinch of cayenne and drizzle with dark chocolate for a subtle kick.
Mediterranean Style
Swap chocolate for white chocolate and sprinkle crumbled pistachios over the top.
Common Mistakes to Avoid
Learn from others' mistakes for perfect results
- Over‑baking leads to a hard top.
- Using stale marshmallows results in a dry texture.
- Pressing the crust too lightly causes crumble.
Meal Prep & Storage
Make Ahead Tips
You can press the crust and refrigerate it for up to 24 hours; add chocolate and marshmallows just before baking.
Leftover Ideas
Reheat gently in a skillet over low heat, covering for 2‑3 minutes to revive the gooey center.
Perfect Pairings
Serve this with...
Cooking Timeline
Gather and prep all ingredients; line pan.
Mix crust and press into pan.
Add chocolate and marshmallows, then bake.
Cool slightly, cut, and serve.
 Sweet Bakes & Desserts
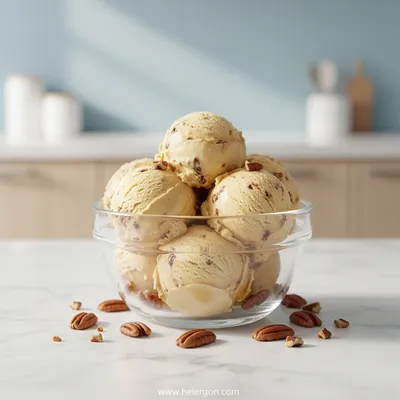
Butter Pecan Ice Cream Recipe
Creamy homemade butter pecan ice cream with crunchy pecans and a buttery finish.
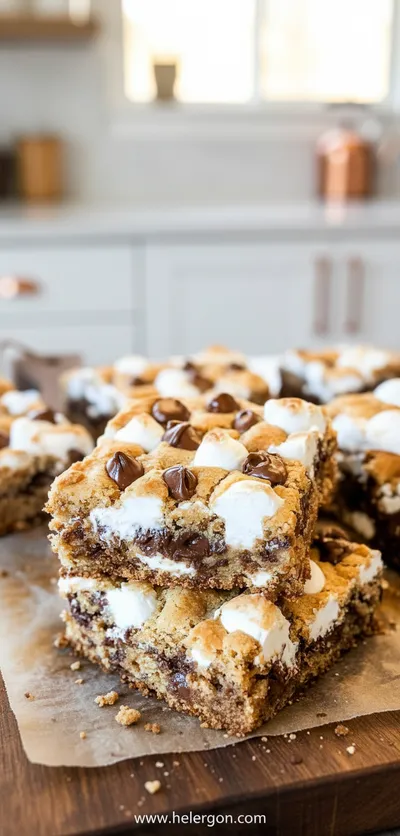
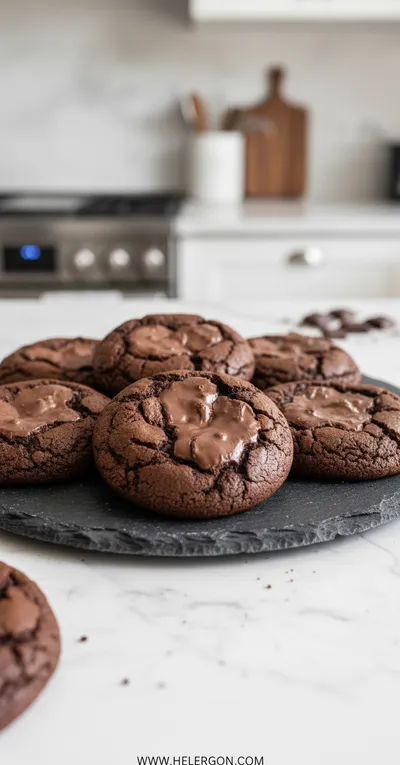
Smores Cookie Bars
Indulge in gooey smores cookie bars – a quick, sweet treat with melted chocolate, toasted marshmallow, and a buttery graham cracker crust that feels like a campfire night in a bite.
Timing
Prep Time
15 Minutes
Cook Time
10 Minutes
Total Time
25 Minutes
Recipe Details
Ingredients
Base
-
01
1 1/2 cups graham cracker crumbs
-
02
1/4 cup melted butter
-
03
2 tbsp brown sugar
-
04
1 tsp vanilla extract
Topping
-
01
1 cup semi‑sweet chocolate chips
-
02
1 cup mini marshmallows
-
03
1 pinch sea salt
Instructions
Preheat the oven to 350°F (175°C). Line a 9‑inch square pan with parchment.
In a bowl, combine graham crumbs, melted butter, brown sugar, and vanilla; press firmly into the pan.
Scatter chocolate chips evenly over the crust, then spread mini marshmallows on top.
Bake for 8‑10 minutes, just until chocolate is melty and marshmallows turn a light golden.
Remove from oven, let cool 5 minutes, then cut into bars and serve warm.
Notes & Tips
-
1
Allow the bars to set for a few minutes before cutting to avoid crumbling.
-
2
If you prefer a crispier top, broil for 1‑2 minutes after baking.
-
3
Feel free to drizzle extra melted chocolate just before serving for a richer look.
Tools You'll Need
-
9‑inch square baking pan
-
Parchment paper
-
Mixing bowl
-
Spatula
-
Measuring cups
-
Oven
Must-Know Tips
-
Don't over‑mix the crust; keep it crumbly.
-
Let the butter melt gently to avoid scorching.
-
Taste the crust mixture before pressing; adjust sugar if needed.
Professional Secrets
-
Room temperature butter blends better with crumbs, giving a uniform base.
-
A brief broil adds a caramelized edge without drying the marshmallows.
-
Using a light hand with the marshmallows preserves their airy texture.

Get Delicious Recipes Weekly
Join 25,000+ home cooks getting our best recipes straight to their inbox.
Free forever • No spam • Unsubscribe anytime